 +1 (855)
Introduction
The world is strange today. Despite the Covid-19 crisis all over the world, most ISPs are fighting a battle to deliver more bandwidth on a daily basis.
- Work from home
- Online schools
- increasing content consumption
All pushed ISPs to their bandwidth limits, leaving ISP’s no option but to look for upgrades, for everlasting bandwidth demands. There, they are having another set of problems, facing them in this completely new and strange world. Chip shortage, logistic and labor health issues caused higher prices and no stock availability. Here in IP ArchiTechs, we are spending lot of our time finding a good solution for our customers and to help them overcome these hard times. Whether that is our regular Team meeting or just a chat with our colleagues in almost any occasion someone mentions something about new solution to improve capacity and performance for our customers.
Starting with a thought, what is available as a platform today, and of course it’s ready to be shipped immediately after you checkout and pay one thing obviously was just in front of me. X86 server, dozens of them. They are left from the time when we were buying new hardware just because new generation was 10 to 15 % faster then previous with some minor or no new features. When we are looking between three generations of the servers that includes DDR4 support and Xeon E5 processors, v3, v4 and 1st generation of the scalable processor family we could not see epic and dramatic improvements between them. That makes these widely avaliable in reseller stock.
That’s why I mainly focused on x86 while running performance tests with new RouterOS 7 in order to see what is achievable with that combination of the software and hardware. In this, my first article on StubArea51 I will try to show you how we achieved 200Gbps aggregate and the testing methodology. Enjoy.

Hardware
When it comes to hardware, I choose the most available servers on the eBay. These are by my opinion:
- Dell R430
- Dell R630
- Dell R730
This does not mean that you can’t choose something equivalent from a different manufacturer, anyone of them have almost the same specs just different brand. So, let’s deep dive into specs of these three and see differences between them.
Pick your Box
Dell R430 or equivalent
- 1U chassis
- Short-depth chassis (23.9 in)
- Supports dual CPU configuration with Intel v3 and v4 processors
- Supports up to two Pci-Express v3.0 cards
- Embedded Network card is integrated (soldered)
Dell R630 or equivalent
- 1U chassis
- Chassis depth (27.57 in)
- Supports dual CPU configuration with Intel v3 and v4 processors
- Supports up to three Pci-Express v3.0 cards
- Network card is in Dell nDC format, and you have three options 4x1Gb, 2x1Gb + 2x10Gb sfp+ and 4x 10Gb sfp+
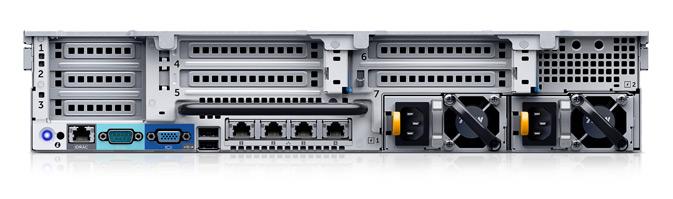
Dell R730 or equivalent
- 2U chassis
- Chassis depth (26.92 in)
- Supports dual CPU configuration with Intel v3 and v4 processors
- Supports up to seven Pci-Express v3.0 cards
- Network card is in Dell nDC format, and you have three options 4x1Gb, 2x1Gb + 2x10Gb sfp+ and 4x 10Gb sfp+
The Dell R730 is most dense platform upon them. It has 7 PCIe slots plus one integrated nDC card where you can also have your 1Gb or 10Gb connections and attach them to the RouterOS 7. For the testing we did, we went with a Dell R730 chassis.
Pick your CPU
When it comes to the CPU recommendations, we had these processors available in our lab:
- 2x Intel Xeon E5-2630v3
- 2x Intel Xeon E5-2680v3
- 2x Intel Xeon E5-2650v4
- 2x Intel Xeon E5-2667v4
- 2x Intel Xeon E5-2699v4
We decided to use middle range processor and our pick for all the tests was 2x Intel Xeon E5-2650v4. Here are the specs for the chosen CPU:
- Base frequency: 2.2Ghz
- Turbo frequency: 2.9Ghz
- Bus speed: 9.6 GT/s
- PCIe lanes: 40
On the chassis we selected for the testing there are 7 PCIe slots, 4 full height and 3 low profile height. Below you can find how slot are associated to the CPU’s:
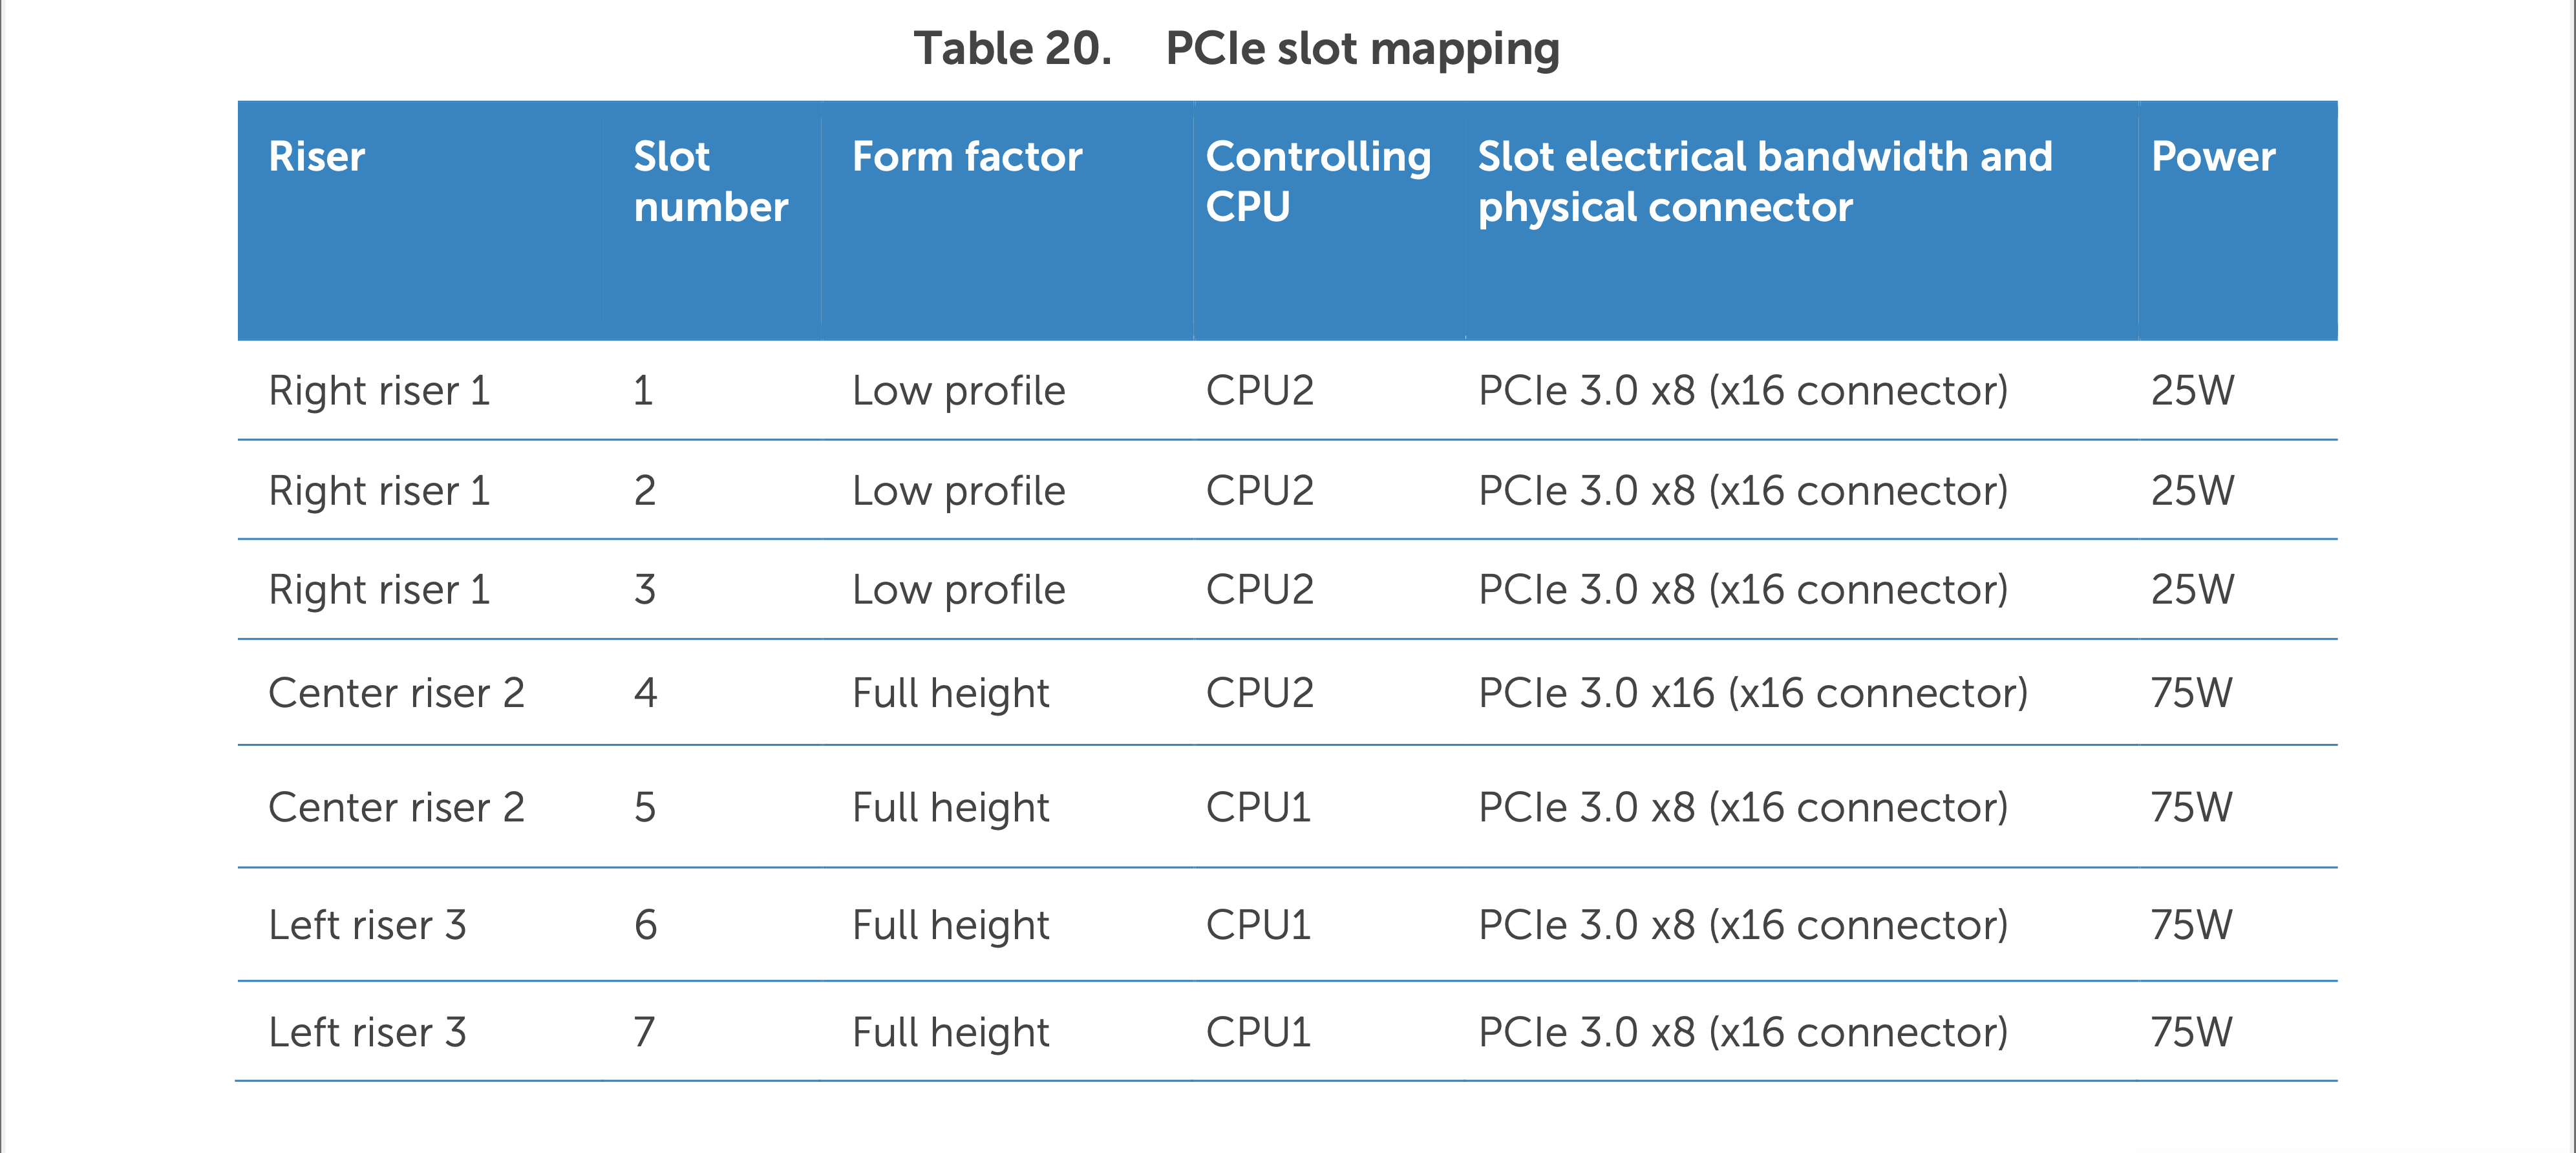
As you can see from the previous picture, we have 4 slots tied to CPU2 and 3 tied to CPU1. Here, NDC card is not included, NDC is always tied up to CPU1. A natural conclusion is that we have good load balancing between CPU’s.
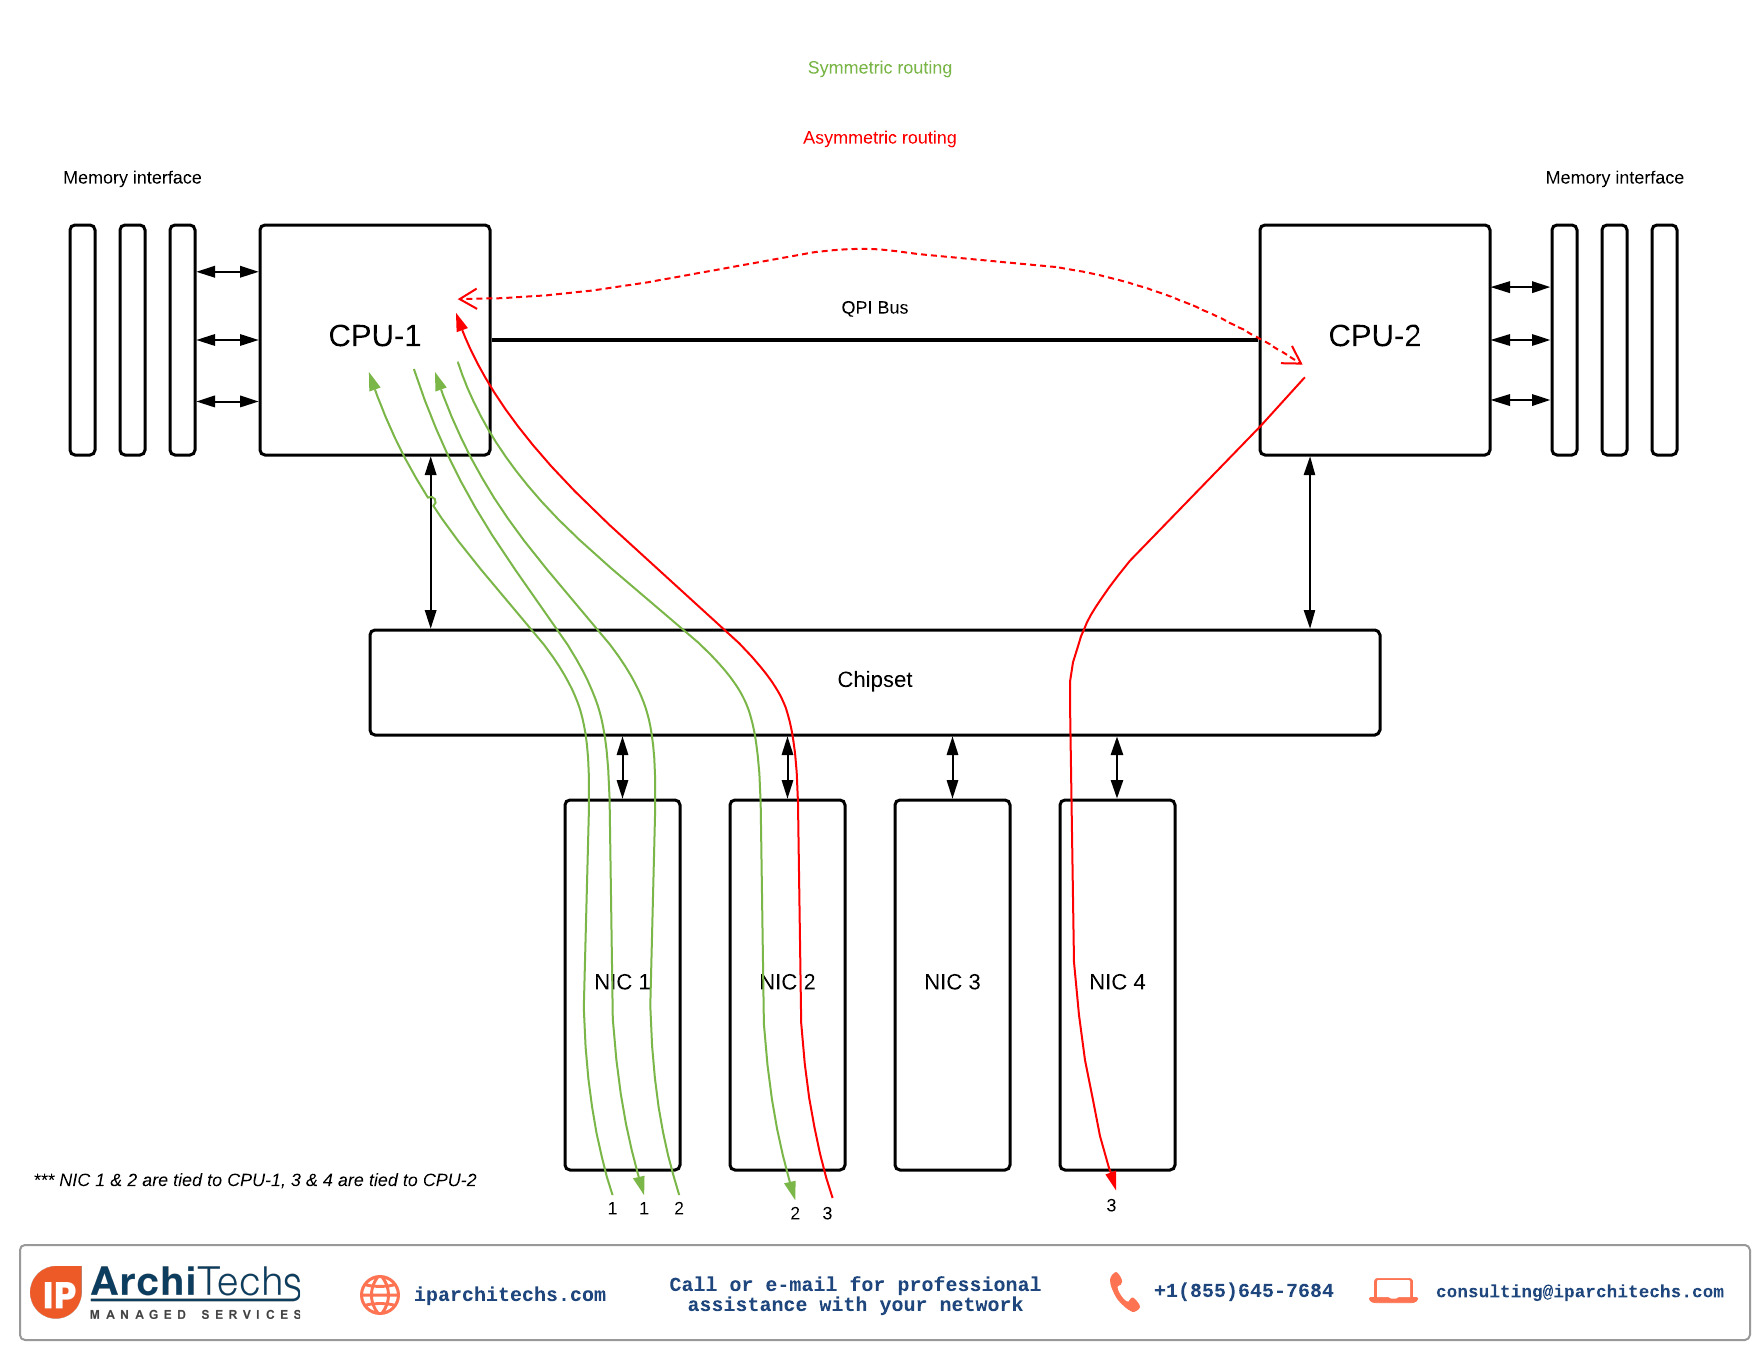
Unfortunately, this is not very good for us and let’s talk about why and how the CPU’s communicate with each other. CPU’s are interconnected with QPI bus and each individual CPU have its own memory controller. Traffic between CPU’s is called “Snoop traffic”. Bad thing about this type of traffic is that QPI traffic introduce asymmetric routing and increasing latency in our use case.
For example: you have two NICs, one is tied up to CPU1 and second is tied up to CPU2, a TCP connection will flow from NIC1 to the CPU1, then will go through QPI link, and then to CPU2, at the end leaving through NIC2. This is causing:
- TCP out of sync
- Packet disorder
- Latency issues.
One way to go around this is to keep NIC groups separated and make connection to the switch accordingly. If you have three NICs tied to the CPU2 best way is to only group them into the one LACP and to not add NICs that are tied to the CPU1. With this you will minimize impact of the issues stated above.
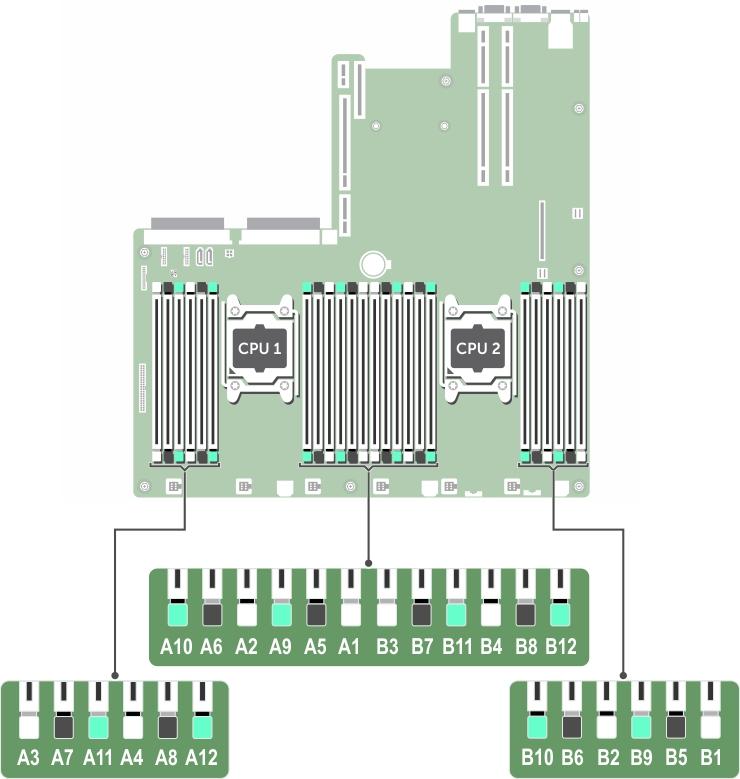
Pick your memory
Memory configuration in our use case is not crucial. We kept in Advanced ECC mode configured with two banks for each CPU. We had 32GB stick in A1, A2, B1 and B2 slot, that gave us plenty of memory available (128GB) which is more than we need. Our thinking is that you will be probably good with four 16GB or even 8GB sticks (if you find it anywhere).
Peripherals and RAID controller
On the Intel Xeon v3 and v4 processor you have 40 PCIe lanes available per CPU. Our idea is to keep them as free as possible. You will not need the RAID controller, or any other peripherals attached to your Router OS. We used the SATA port that is on motherboard to connect the SSD and install software on it.
Pick your NIC’s
Choosing the right NIC is essential for your Mikrotik RouterOS CHR. We went through a lot of different options but one really stuck out. That is Intel X520 dual 10Gbps SFP+ card. This is PCIe 2.0 x8 card.
Reason why we went with Intel X520 is that first we have a lot of them in our lab, second, they are widely available and affordable. This card has been supported for a long time on Mikrotik and has the most important drivers, that allow pass-through from the hypervisor directly to the OS.
We installed six of them in our chosen box (fixed form factor server), populating Slot 1,2,3,4,5,6 respectively. This setup will give as 120Gbps of potential throughput and its perfect for what we trying to accomplish which is to break 100Gbps barrier with our Mikrotik CHR router.
Pick up PSU’s, iDrac
PSU are also one of the important factors, giving you necessary redundancy for your system. Platinum version is good option because will save your money because its energy efficient. Always have two PSU to have fully redundant setup.
iDrac (or equivalent) can comes handy especially when you need to recover your router remotely and you need to see what’s happening. We have enterprise licenses in our lab so we were able to login to remote console through web and access chassis keyboard, mouse and monitor remotely.
Software
Hypervisor: ESXi version 7.
Mikrotik: 7.1beta6
Ubuntu Server 20.04
Ubuntu server was used to hold iPerf3 Server and Client side on the other servers that was for generating traffic.
LAB Setup
After we choose all necessary components for our chassis, where we will run the Mikrotik CHR, let’s see what else we need for the LAB. We need following things:
- 12x Traffic generators
- 10Gbit Switch
- Lot of 10Gb DAC cables
- Ethernet Patch cables
- 1Gbit Switch for ESXi management
- 100Mbps Switch for iDrac management
- Console Server for remote access to the switch console ports
- UPS

Traffic generators used:
- 8 Dell R430:
- 2x Intel Xeon E5-2630v3
- 128Gb Ram
- QLogic® 57810 dual-port 10Gb
- 1 Dell R630:
- 2x Intel Xeon E5-2680v3
- 128Gb Ram
- Intel X520 dual 10Gb port SFP+
- 1 Dell R630:
- 2x Intel Xeon E5-2630v3
- 128Gb Ram
- Dell nDC 2x1Gb i350 + X520 2xSFP+
- 2 Fujitsu RX2530 M2
- 2x Intel Xeon E5-2667v4
- 128Gb Ram
- Mellanox® ConnectX®-3 dual-port 10Gb Direct Attach/SFP+
All the traffic generators had ESXi 7.0b installed on them and Ubuntu Server 20.04 as a vm with passthrough enabled for NIC.
10Gbit Switch
Our primary choice for the switch was Dell S4048-ON with 48 SFP+ and 6 QSFP ports, capable of handling 1.44 Tb which is more than enough we needed for the tests.
All other equipment various, but it’s based on a Mikrotik switches, Digi Console Server and APC UPS’s.
Software configurations
VMware ESXi
There are not really configuration changes in ESXi other than default settings, only one thing that is configured is Pass-Through being enabled on 10 Gbit NIC’s.
Mikrotik VM configuration
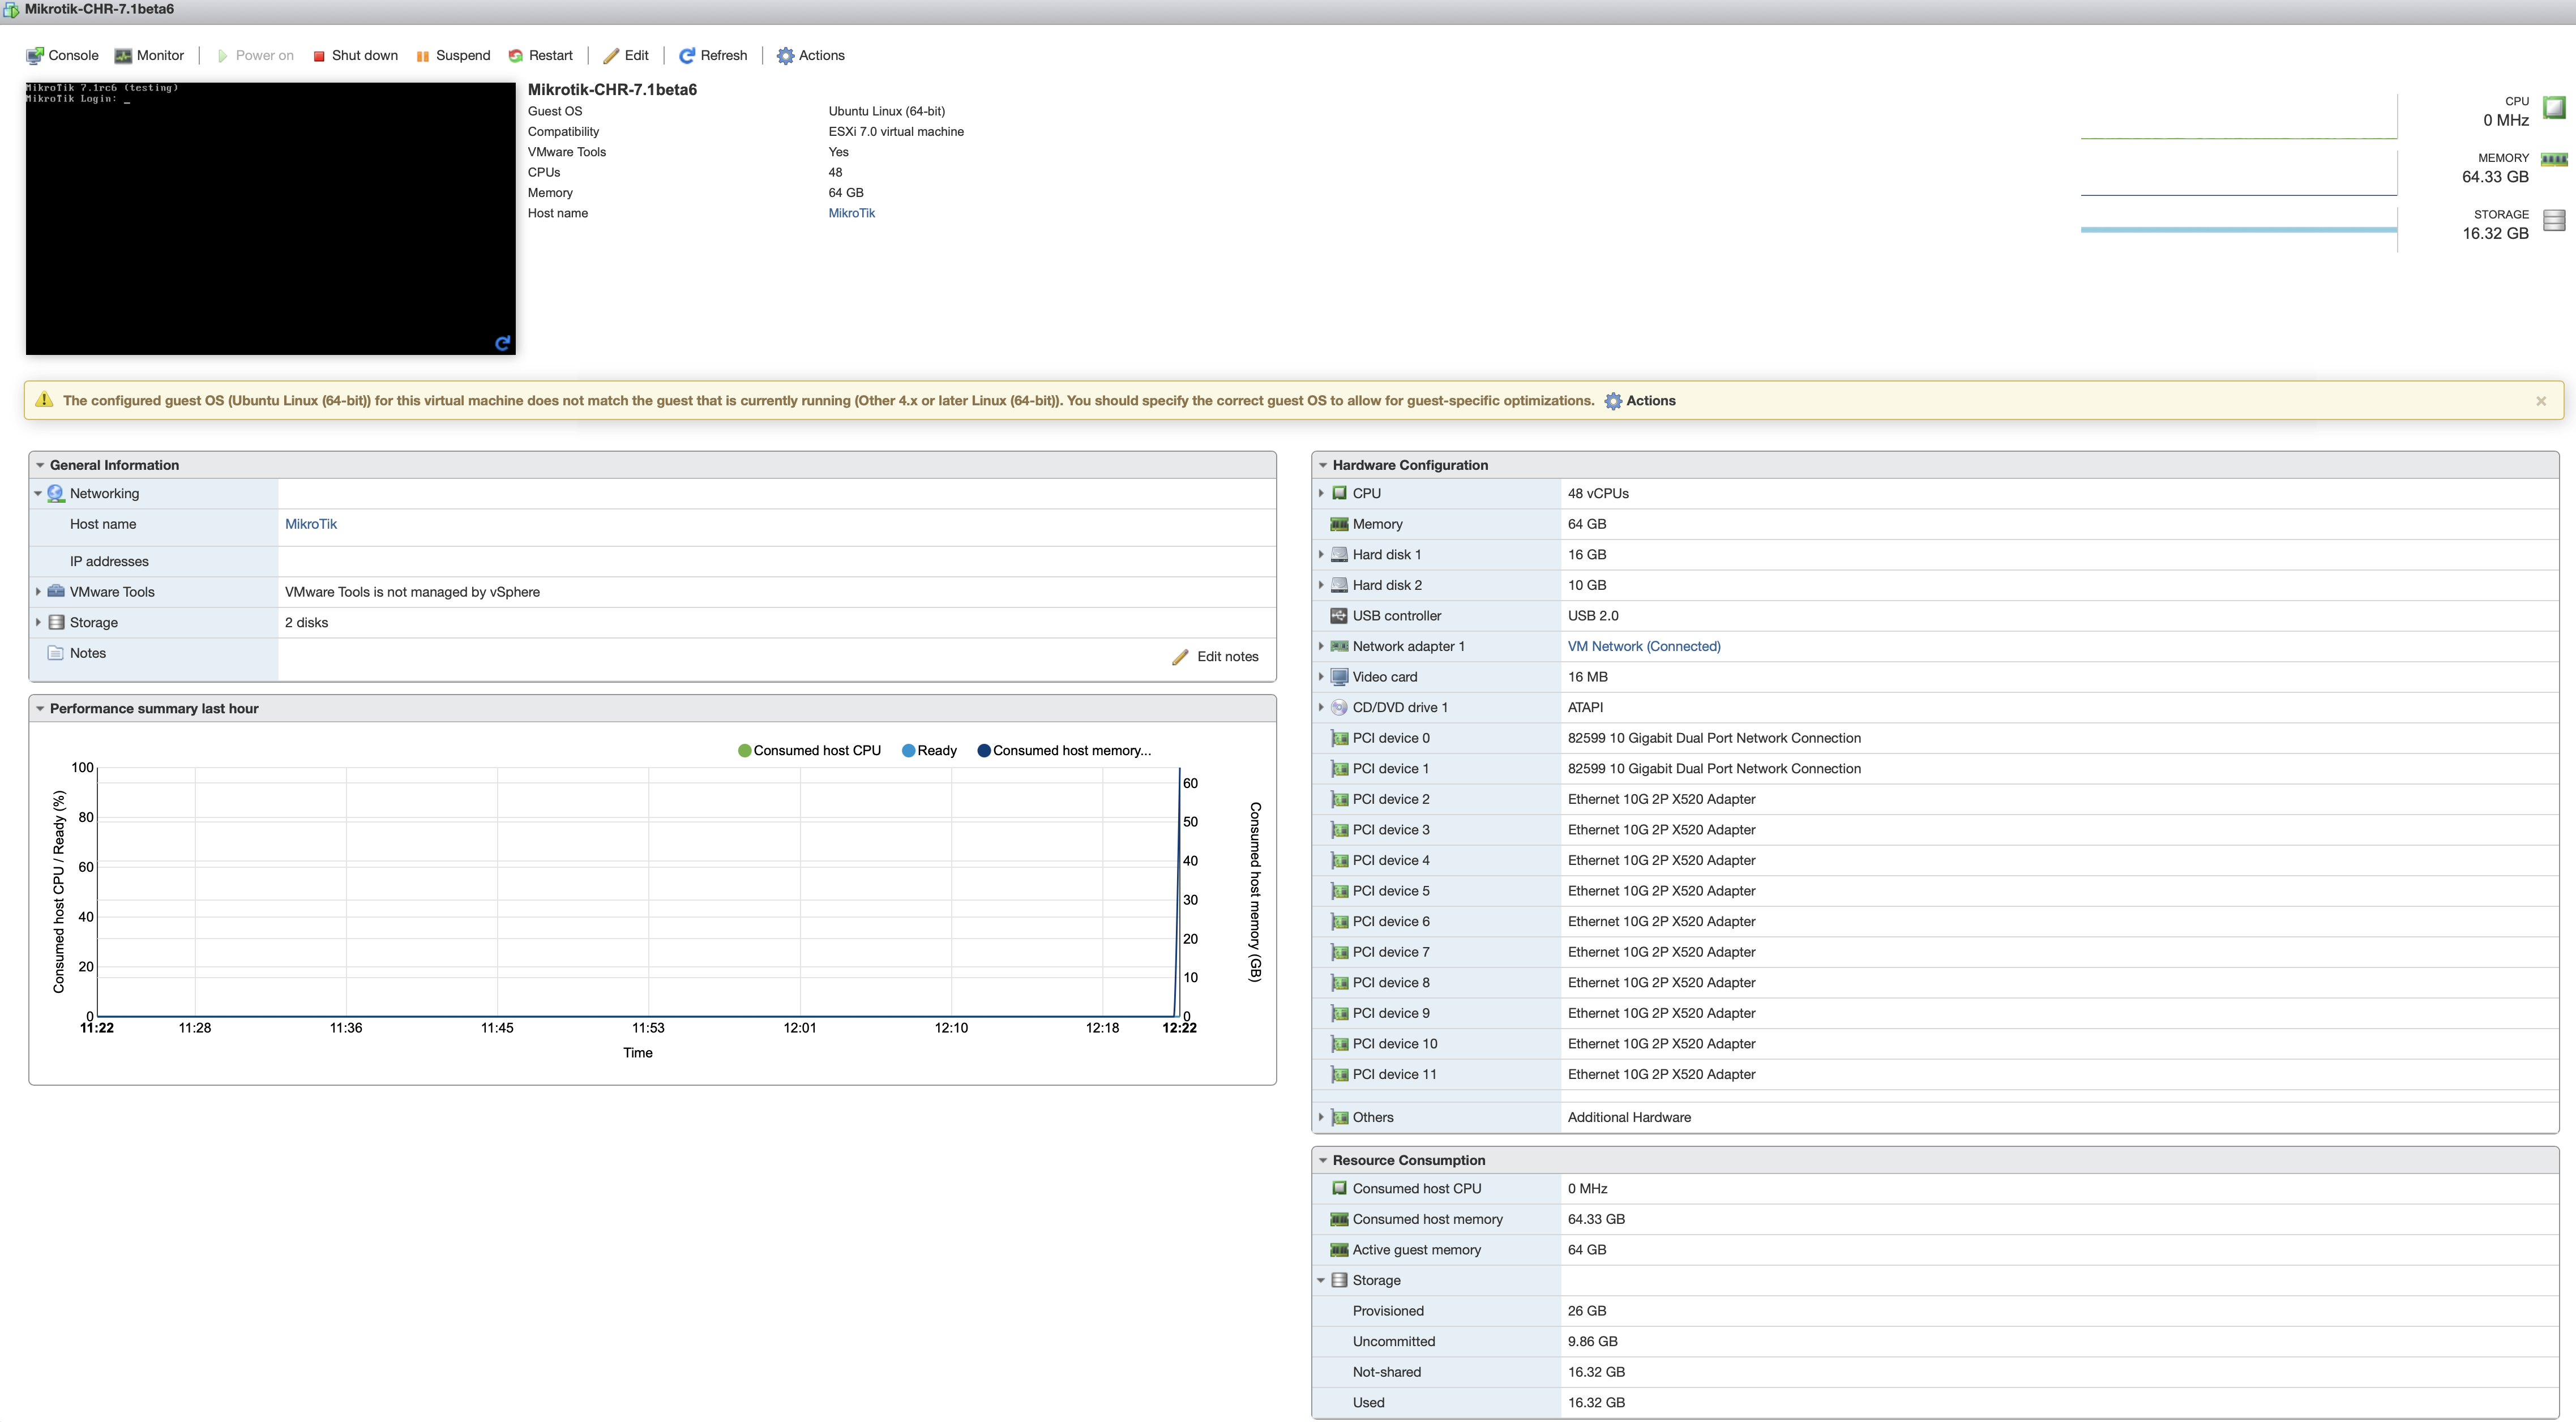
Mikrotik RouterOS CHR
/interface ethernet
set [ find default-name=ether8 ] mtu=1520 name=ether1
set [ find default-name=ether1 ] mtu=1520 name=ether2
set [ find default-name=ether2 ] mtu=1520 name=ether3
set [ find default-name=ether3 ] mtu=1520 name=ether4
set [ find default-name=ether4 ] mtu=1520 name=ether5
set [ find default-name=ether5 ] mtu=1520 name=ether6
set [ find default-name=ether6 ] mtu=1520 name=ether7
set [ find default-name=ether7 ] mtu=1520 name=ether8
set [ find default-name=ether1 ] disable-running-check=no mtu=1520 name=ether9
/interface bonding
add mode=802.3ad name=Po0 slaves=ether1,ether2,ether3,ether4,ether5,ether6,ether7,ether8 transmit-hash-policy=\
layer-3-and-4
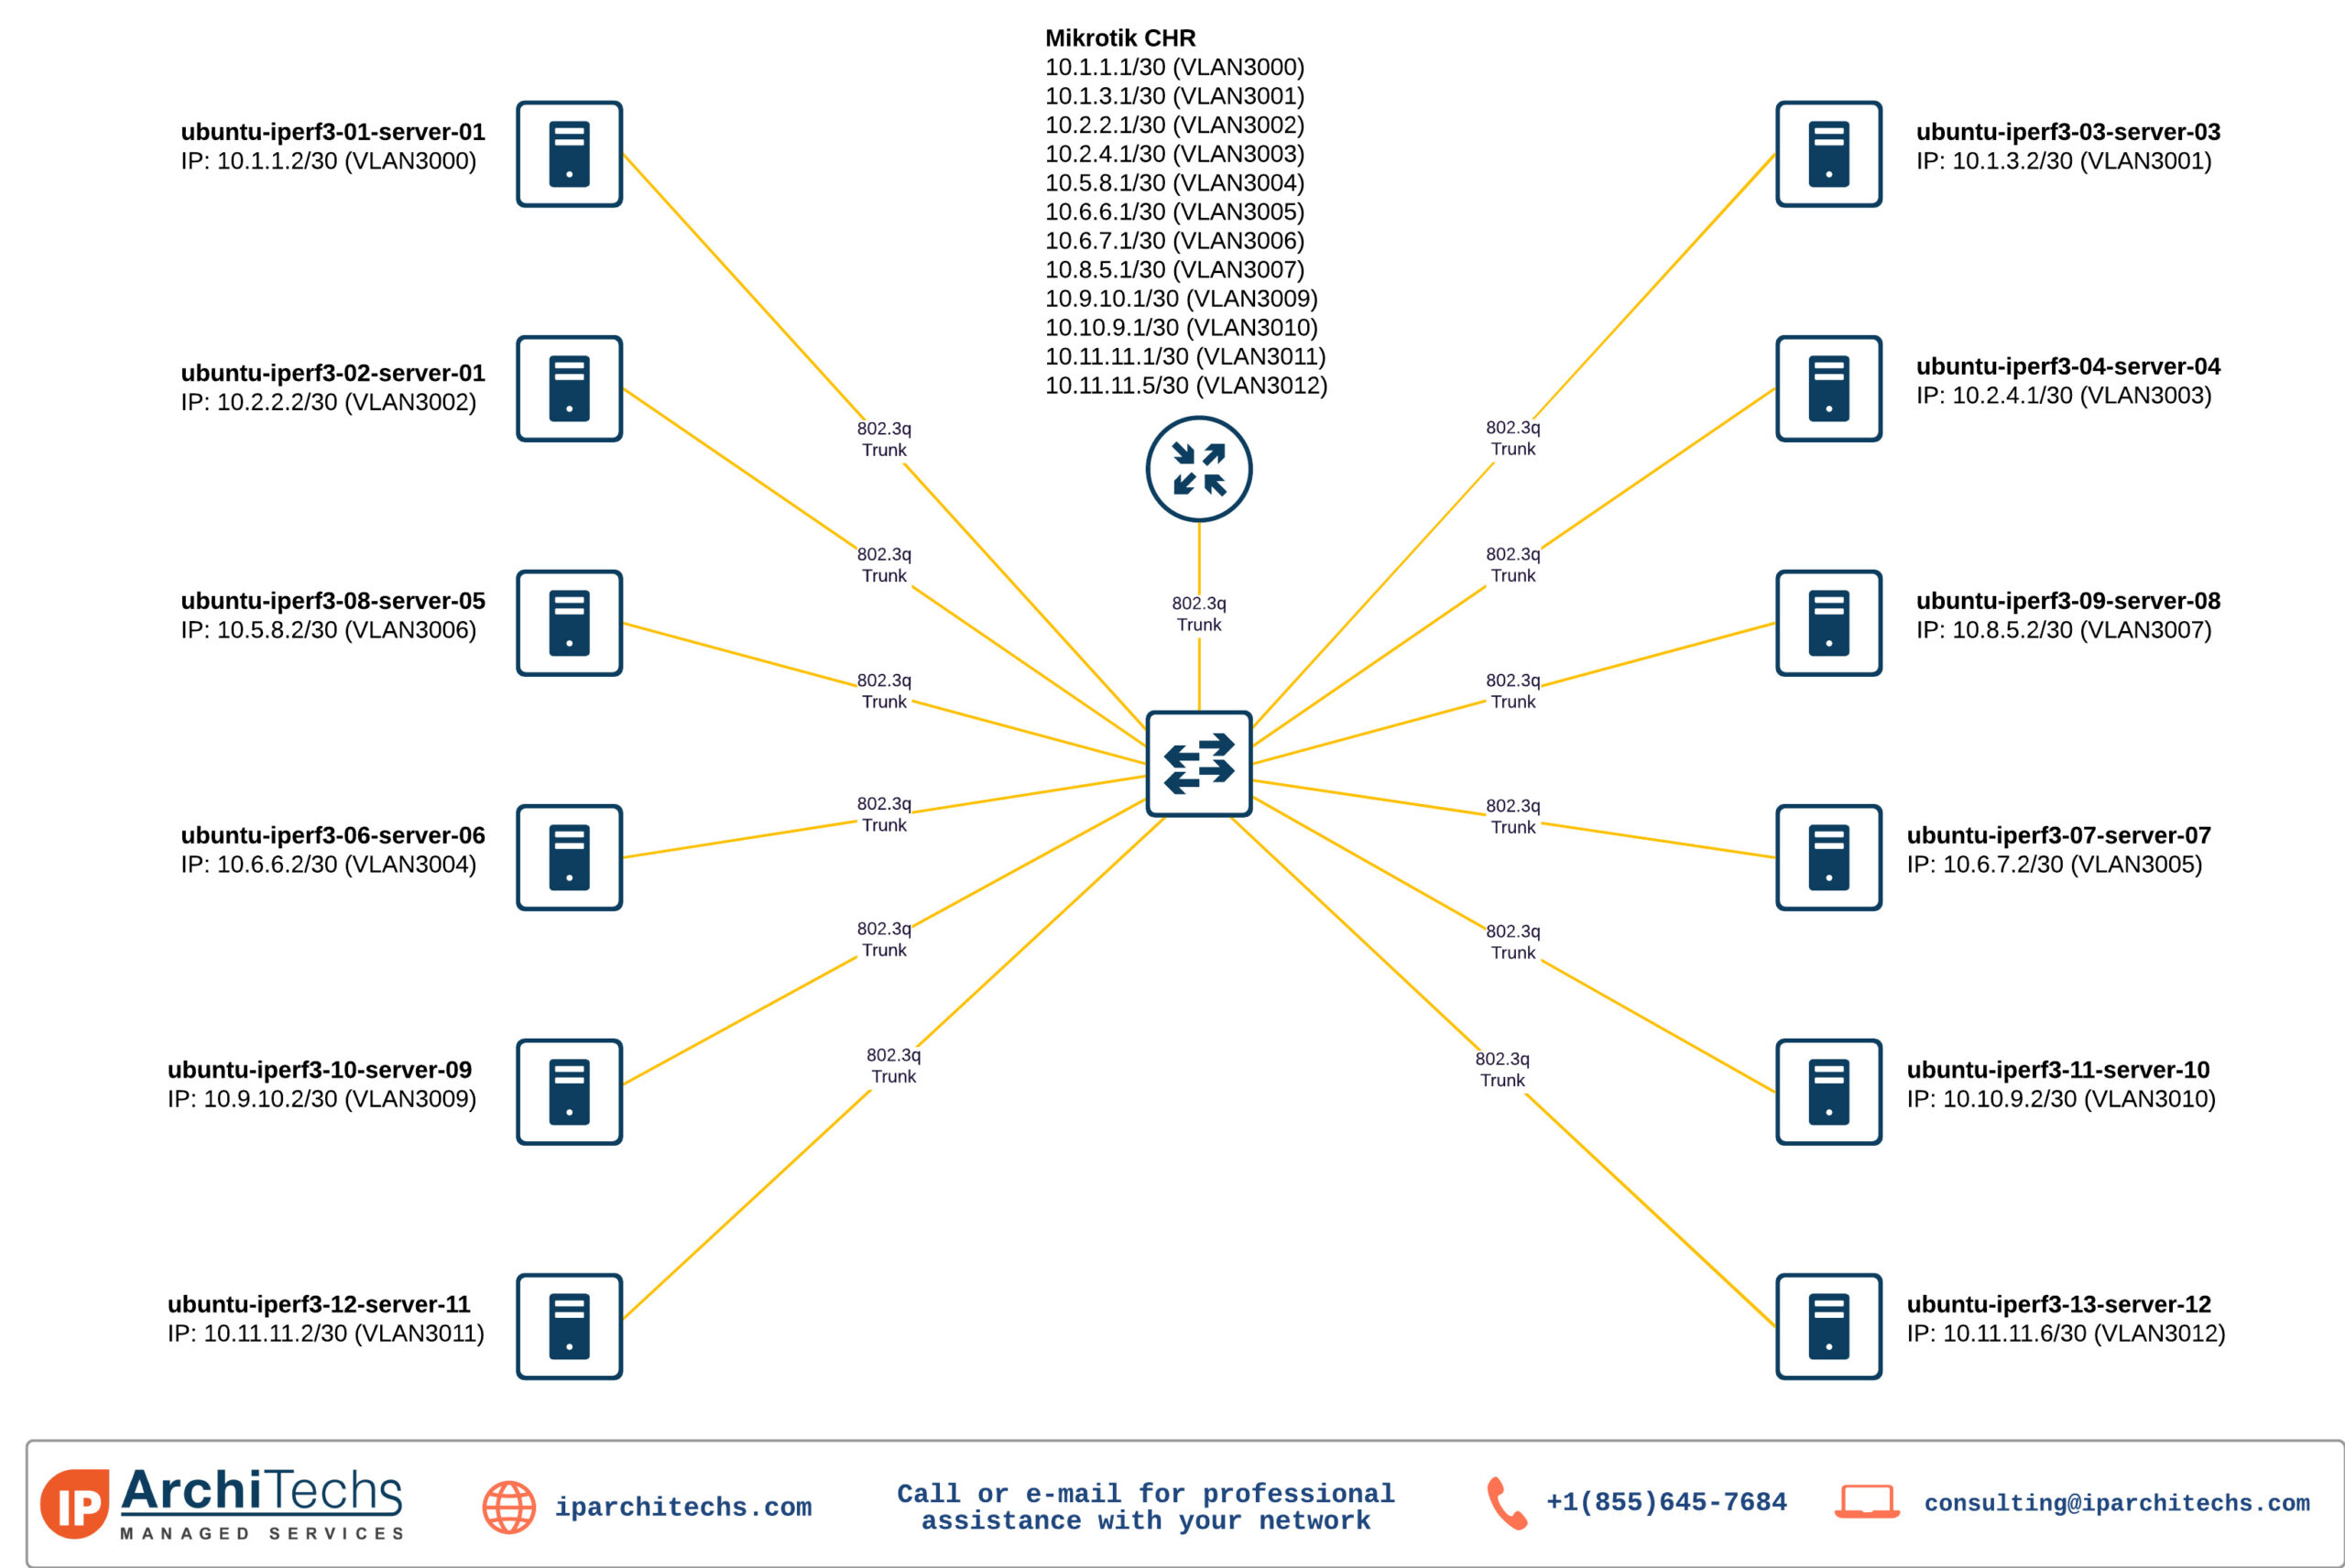
/interface vlan
add interface=Po0 name=VLAN3000-SERVER-01-IPERF-01-SERVER-03 vlan-id=3000
add interface=Po0 name=VLAN3001-SERVER-03-SERVER-01 vlan-id=3001
add interface=Po0 name=VLAN3002-SERVER-01-IPERF-02-SERVER-04 vlan-id=3002
add interface=Po0 name=VLAN3003-SERVER-04-SERVER-01 vlan-id=3003
add interface=Po0 name=VLAN3004-SERVER-06-SERVER-07 vlan-id=3004
add interface=Po0 name=VLAN3005-SERVER-07-SERVER-06 vlan-id=3005
add interface=Po0 name=VLAN3006-SERVER-05-SERVER-08 vlan-id=3006
add interface=Po0 name=VLAN3007-SERVER-08-SERVER-05 vlan-id=3007
add interface=Po0 name=VLAN3009-SERVER-09-SERVER-10 vlan-id=3009
add interface=Po0 name=VLAN3010-SERVER10-SERVER-09 vlan-id=3010
add interface=Po0 name=VLAN3011-SERVER-11-SERVER-12 vlan-id=3011
add interface=Po0 name=VLAN3012-SERVER12-SERVER-11 vlan-id=3012
/system identity
set name=RouterOSUbuntu Server 20.04
Sample Ubuntu traffic generator netplan configuration
network:
  bonds:
    bond0:
      interfaces:
      - ens160f0
      - ens160f1
      parameters:
        lacp-rate: slow
        mode: 802.3ad
        transmit-hash-policy: layer3+4
  ethernets:
    ens160f0: {}
    ens160f1: {}
    ens224:
      dhcp4: true
  version: 2
  vlans:
    bond0.3000:
      addresses:
      - 10.1.1.2/30
      routes:
      - to: 10.1.3.0/30
        via: 10.1.1.1
      - to: 10.6.7.0/30
        via: 10.1.1.1
      id: 3000
      link: bond0
      nameservers:
        addresses: []
        search:
iPerf3
Client:
Client configuration includes running three separate instances and 10 parallel streams to better utilize multi-core performance
iperf3 -c <server IP> -T p1 -P 10 -t 0 -p 5101 &
iperf3 -c <server IP> -T p2 -P 10 -t 0 -p 5102 &
iperf3 -c <server IP> -T p3 -P 10 -t 0 -p 5103
Server:
Three separate instances also for the server
iperf3 -s -p 5101 &
iperf3 -s -p 5102 &
iperf3 -s -p 5103
TEST RESULTS
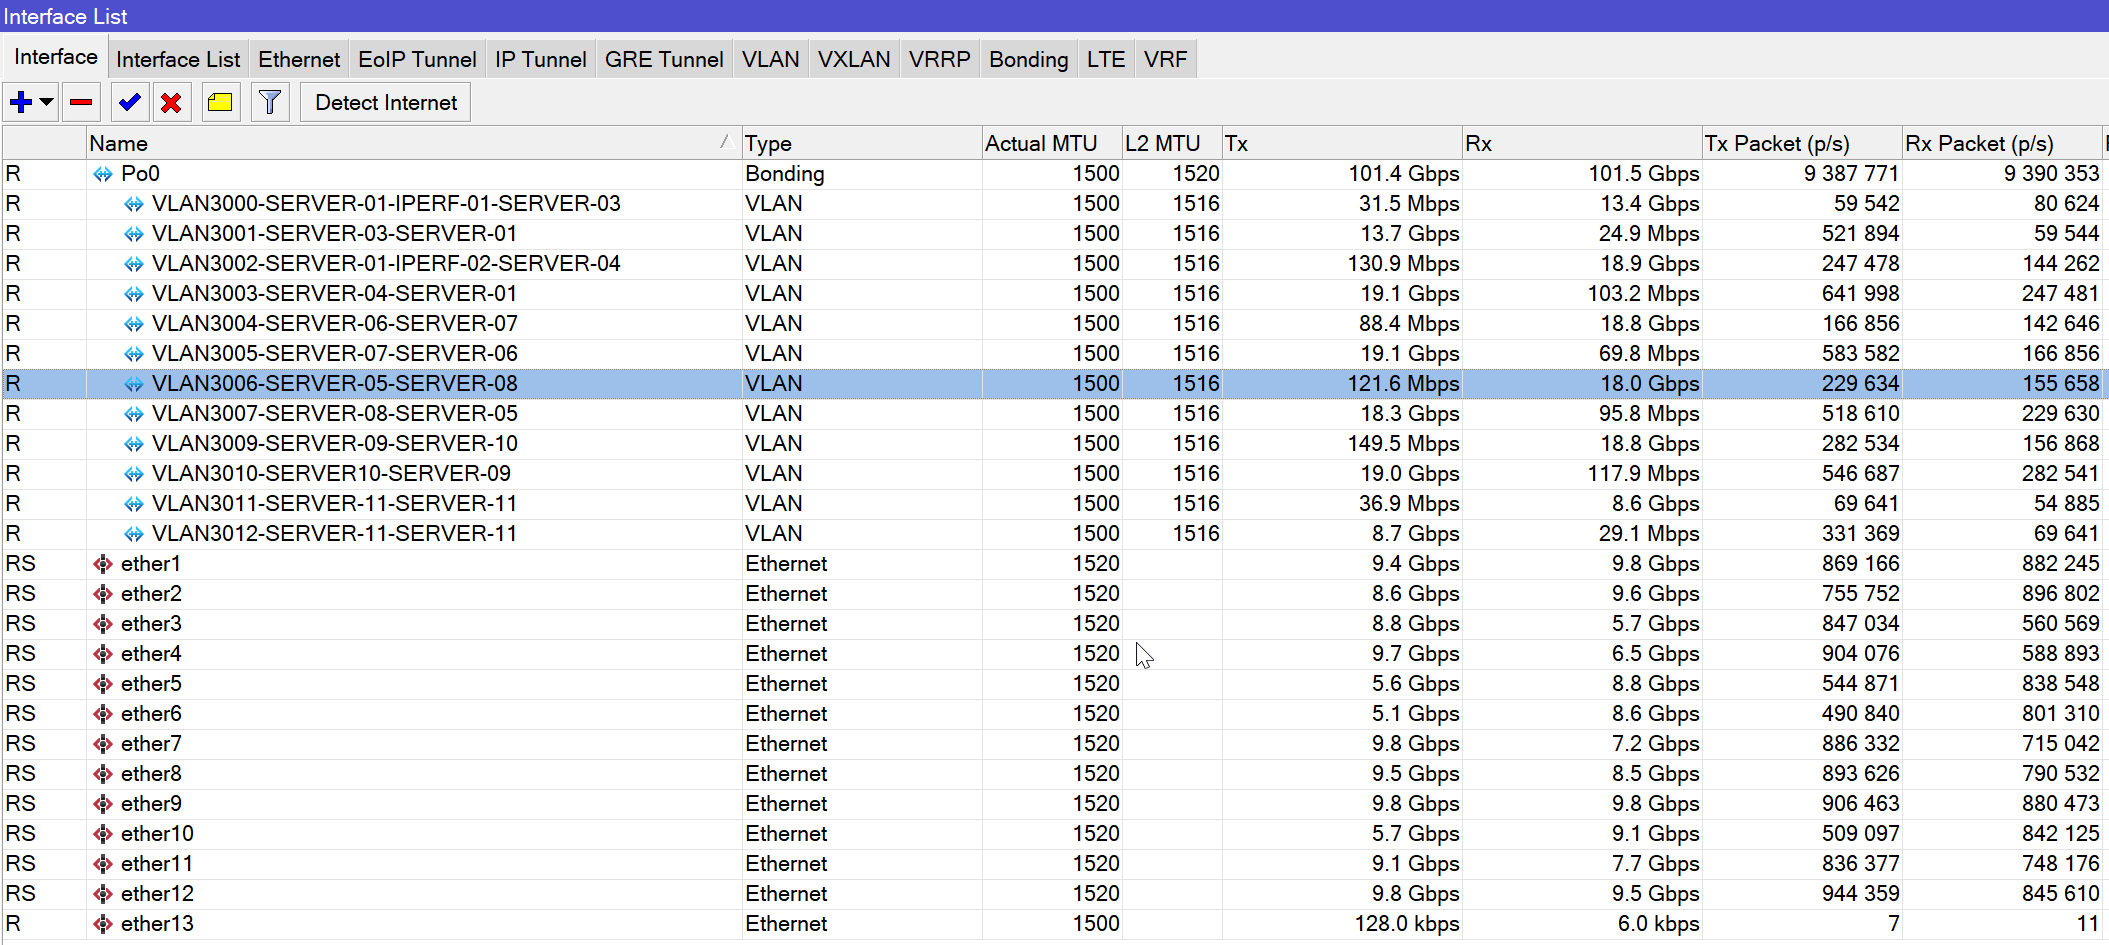
L2/L3 Diagram
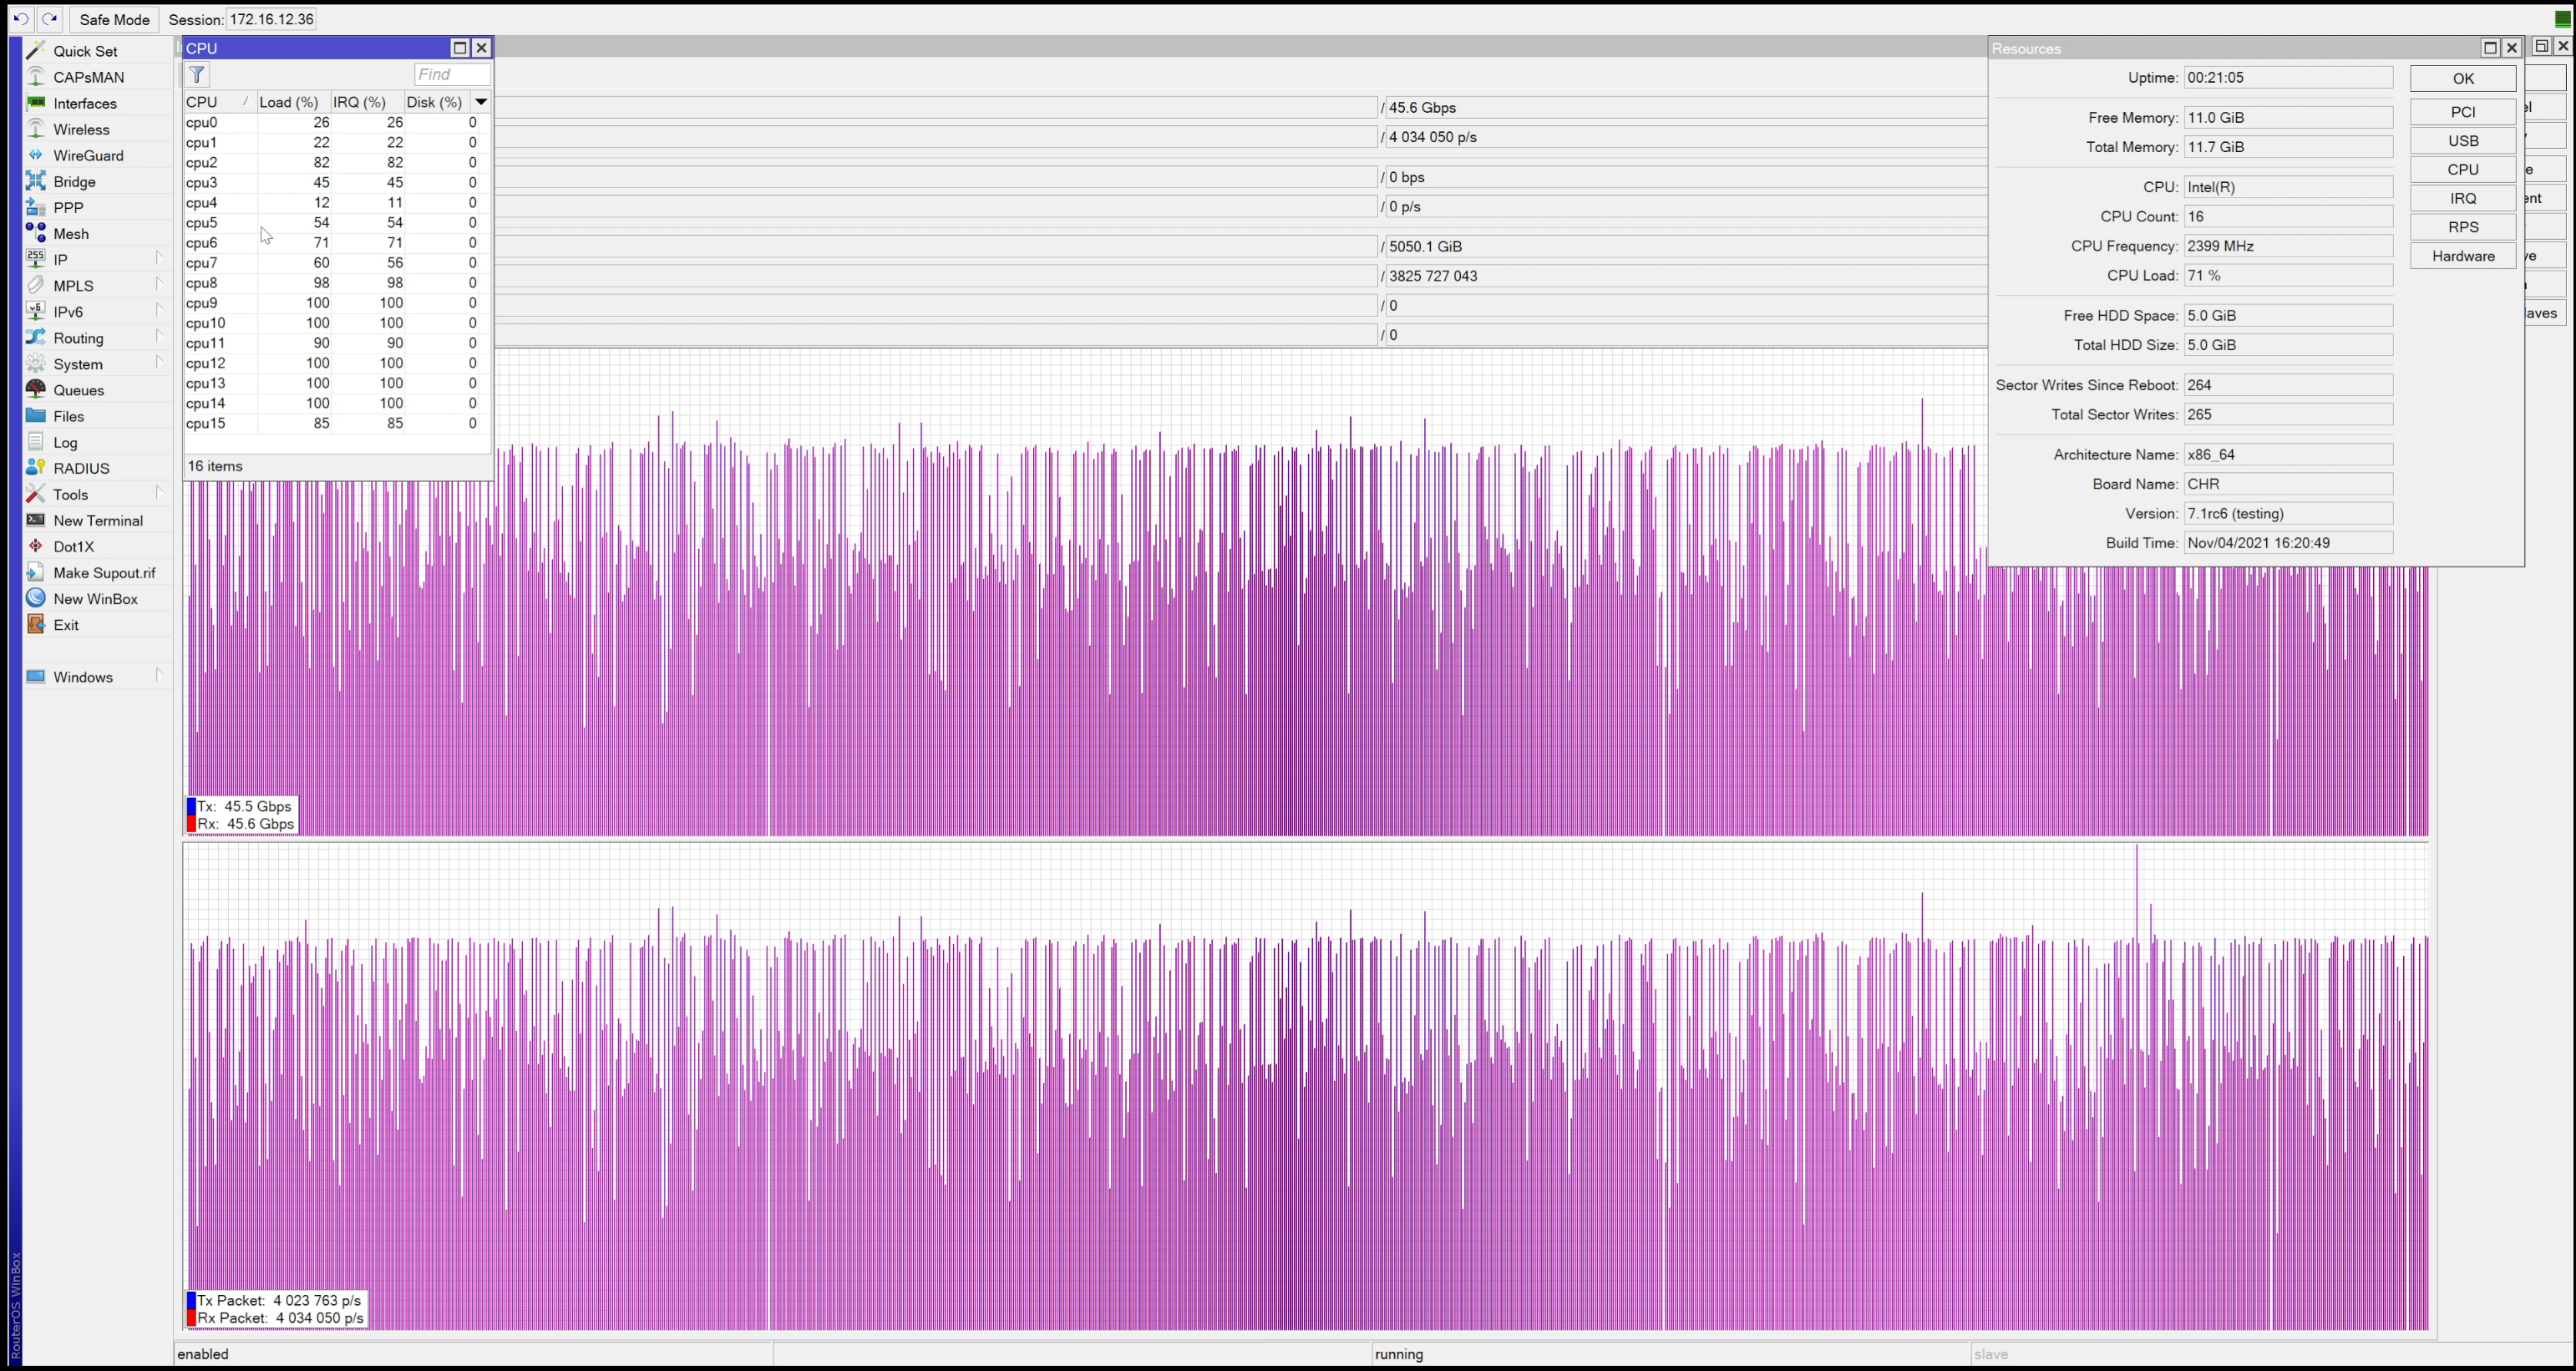
Finally at the end we run the tests. Results are great. We were able to push almost 10 Million packets and 101Gbps of full duplex throughput (total aggregate throughput is 202Gbps). Please see picture attached below which is actual test running picture:
We did also another type of the test, to see how new CHR v7 performs with and without hyper threading enabled. See screenshots below:
HyperThreading On
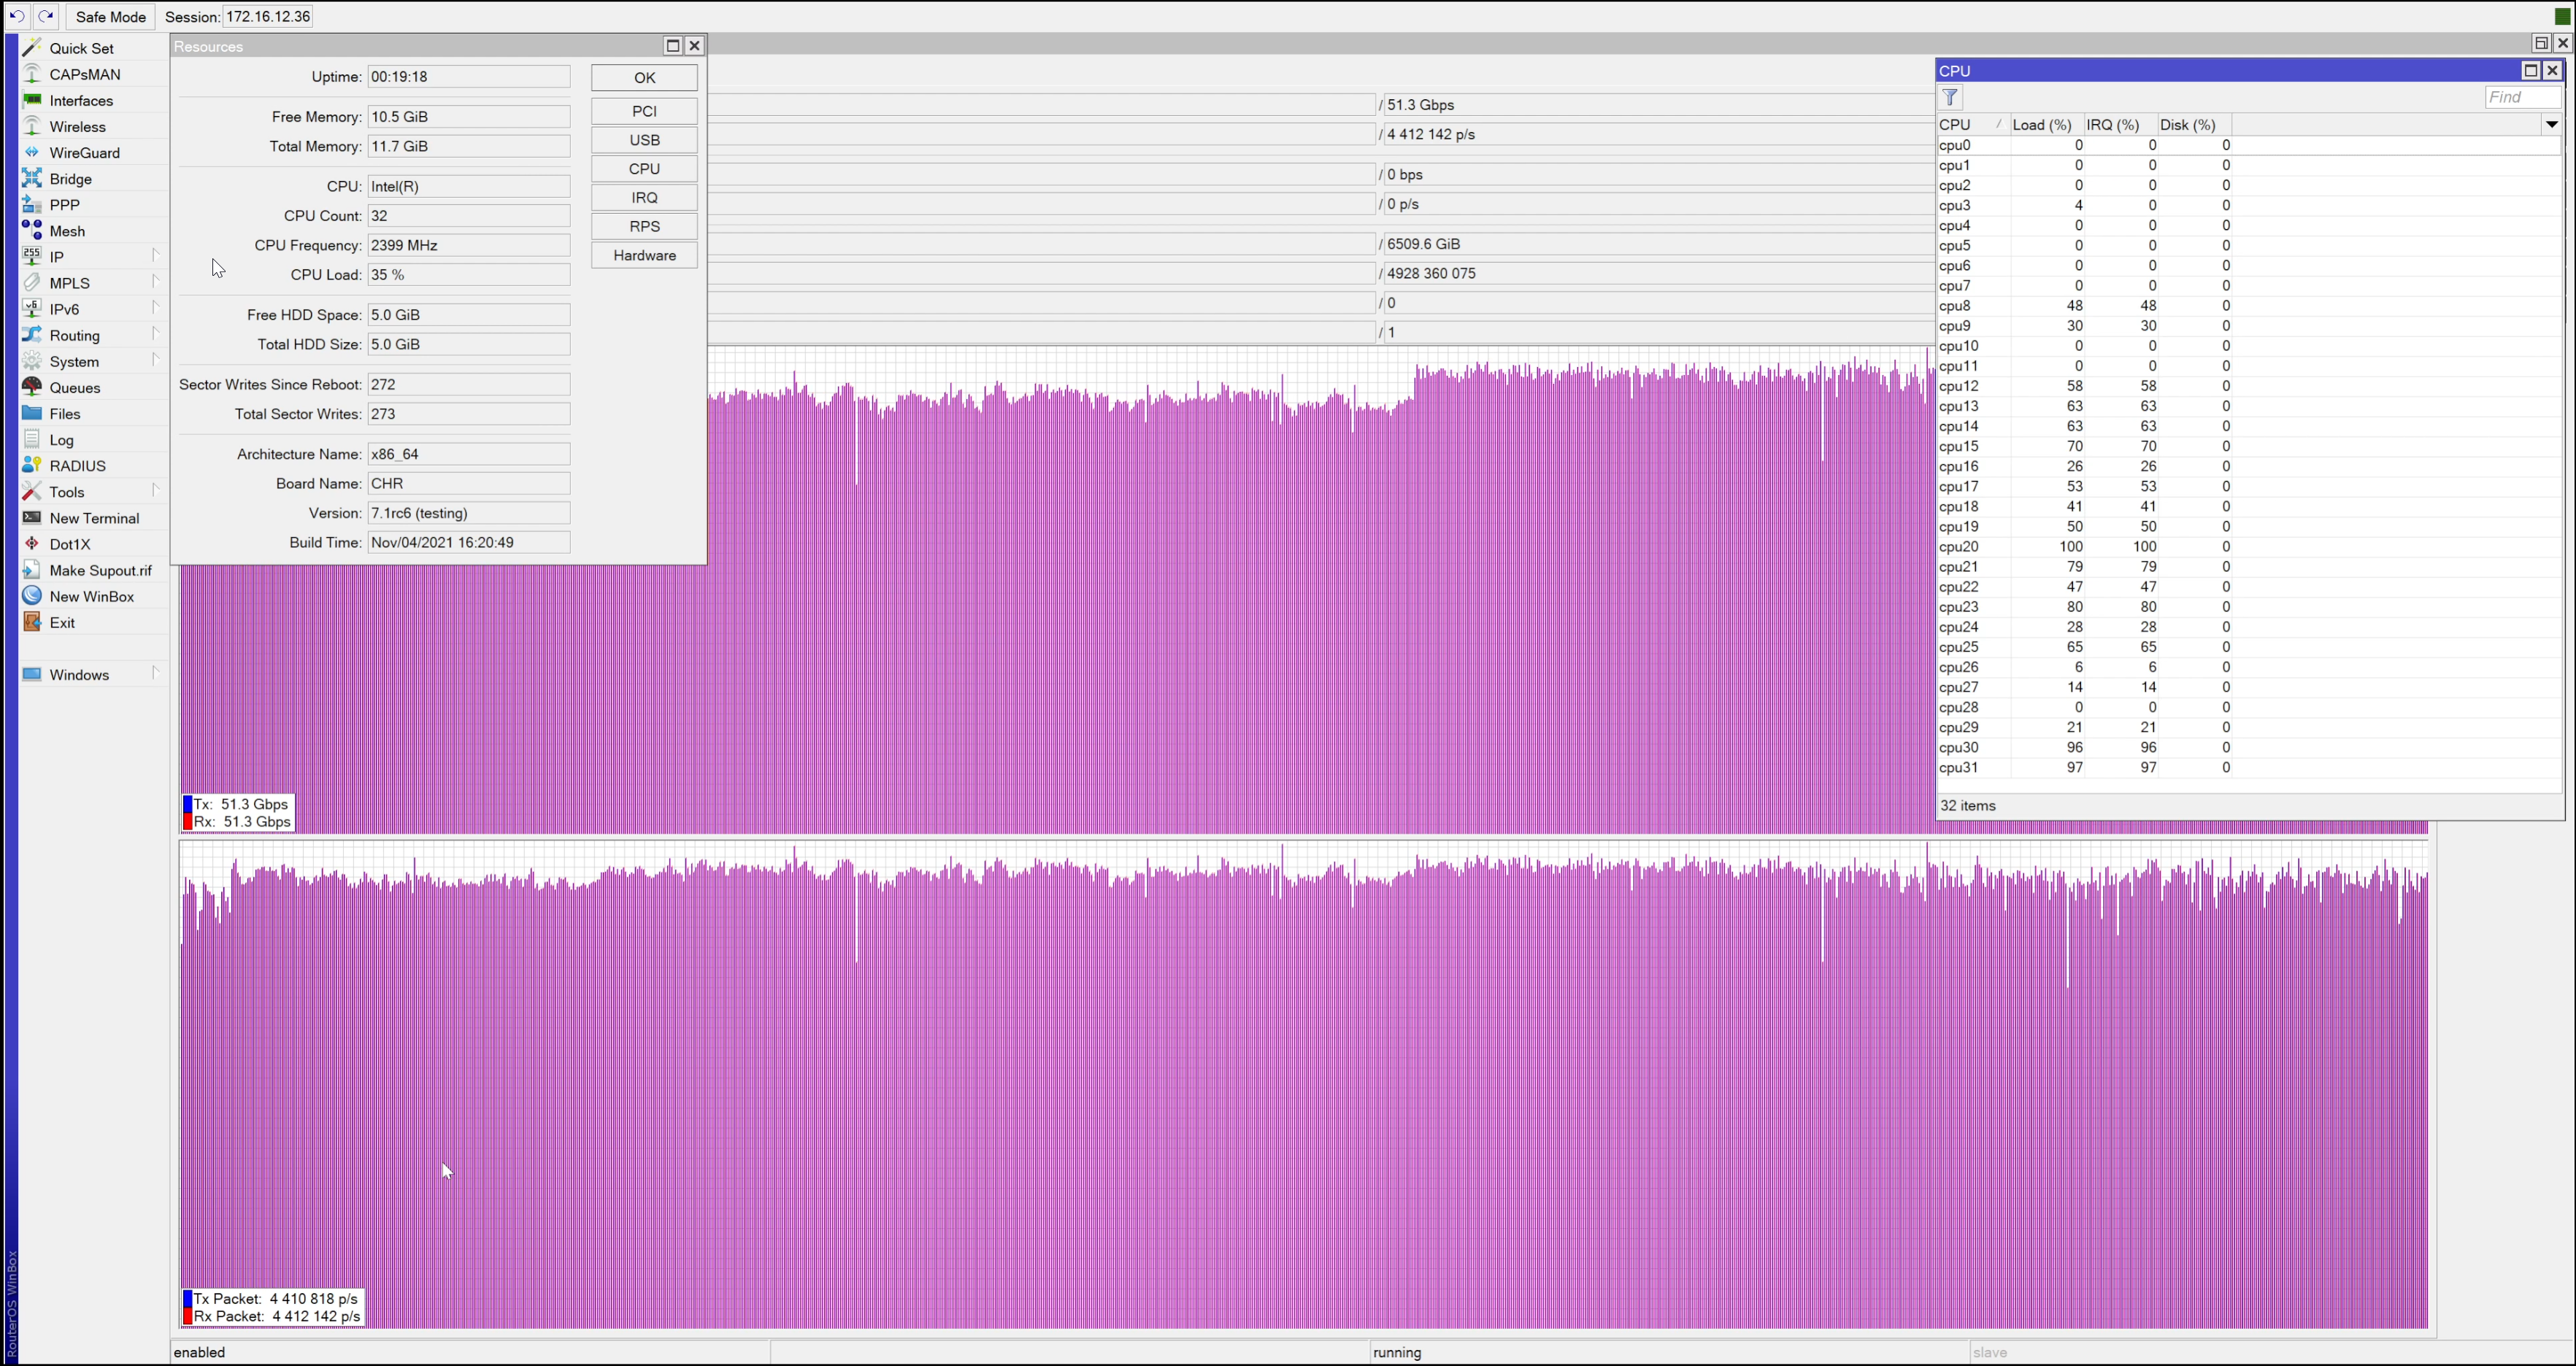
HyperThreading Off
This test gave us interesting result, new v7 CHR performs much better with HyperThreading enabled.
Conclusion
RouterOS v7 CHR performs much better with the new kernel and new routing engine. With v6 we were able to do a maximum of 27Gbps in our labs. CPU multicore utilization is much better, and load balanced across the cores. It does also support newer hardware like Intel XL710 which we will be testing next.
So, I must conclude, we did broke 100G barrier with Mikrotik!!!
All test’s has been done without measuring:
- Packet out of order
- Retransmissions
- Latency measuring
We are working on setting up a Cisco TREX traffic generators to measure RFC2544 performance of the Mikrotik CHR virtual router
Special thanks to whole IPA crew for the support, especially to:
Kevin-Wan Myers – IPA Jedi Master (thanks for the force)
Derek Mr Anderson – Supreme commander of our Matrix
Matrix Vincman Shuele – (he actually took glove off from Tanos, but Ironman wanted to show off)